WaterGadget

Reviews with Comprehensive Guide

  • Home
  • Water Softener
    • Fleck Water Softener
    • Portable Water Softener
    • Water Softener Shower Head
    • Salt Free Water Softener
    • Water Softener for Well Water
    • Water Softener Salt
    • Potassium Chloride Water Softener
  • Water Heater
    • Personal Heater
    • Patio Heater
    • Tankless Water Heater
    • Space Heater
    • Forced Air Space Heater
    • Infrared Space Heater
  • Water Filter
    • Water Filter Pitcher
      • Pur Water Filter Pitcher
      • Brita Water Filter Pitcher
    • Under Sink Water Filter
    • Inline Water Filter
    • Countertop Water Filter
    • Faucet Water Filter
    • Refrigerator Water Filter
    • Reverse Osmosis Water Filter
    • Whole House Water Filter
  • Product Reviews
    • Water Dispenser
    • Water Flosser
    • Water Ionizer
    • Water Hose Nozzle
    • Water Glasses
    • Waterproof Cameras
    • Water Sprinklers for Lawns
    • Watering Can
    • Watering Globes
    • Watering Wand
    • Water Table For Kids
    • Water Boiler
    • Water Bottle
    • Water Distiller
    • Water Shoes
    • Water Timer
    • Gas Pressure Washer
    • Water Alarm
    • Water Pressure Gauge
    • Pet Water Fountain

How to Use a Water Flosser

April 15, 2017 By Water Gadget

Looking out on how to rightly make use of a water flosser? Here we would like to present to you the simple step-by-step guide to getting started with this amazing dental product.

We will begin with a brief intro on Water Flosser first, so it is a dental device which is used for removing food particles stuck between your teeth and the gum.

The external settings required to run the unit include one outlet for a power source and one water reservoir.

How to Use a Water Flosser

Water Flosser more often known as an oral irrigator, is a device which shoots a thin stream of water. This stream of water is sprayed on the area between your gum and teeth. It helps with removing food particles which are not effectively removed by brushing.

The water flosser also helps with dealing with plaque issues.How to Use a Water Flosser

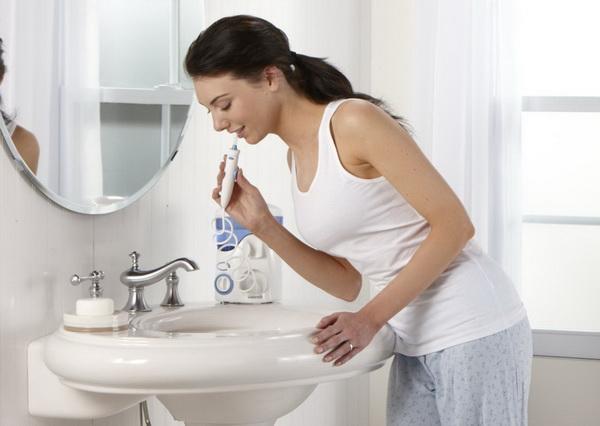
Following are the steps to be followed while using one Water Flosser:

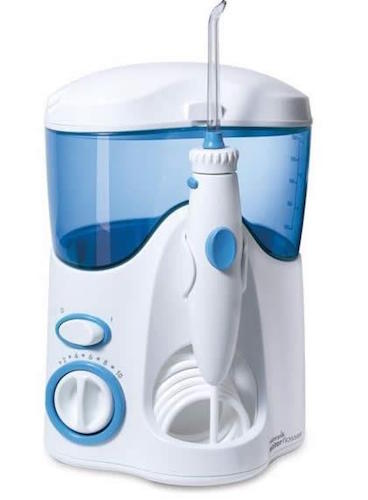
  1. You will find one small container provided along with the system for water storage. Fill this reservoir with lukewarm water, and carefully place it on the base.
  2. Make sure that the reservoir is firmly set on the unit. There are different types of tips present for the flossing process. Choose the appropriate flosser tip, and set this on the handle portion of the system.
  3. If you are using the product for the first time, adjust the pressure dial to the highest. Place the flosser tip pointing towards the sink, and run the system till the reservoir gets emptied.
  4. Now again set the reservoir with water, and then set the pressure to the lowest. This is important for the beginners.
  5. Next, you have to lean towards the sink area, and then place the flosser tip inside your mouth.
  6. Finally turn the flosser unit ON. Place the lips close to each other to prevent any splashing. Keep your mouth open enough to let the water pass through your mouth and to the sink.
  7. Start this flossing procedure from the back teeth, and also make sure that you take gradual pauses in between.
  8. Here the flosser tip should be aimed in such a way that it makes a 90° with the place just above the gum line here.
  9. After you have completed the flossing, then turn the unit OFF. Choose the tip eject option to remove the tip.

In this manner, you can perform the flossing process at home using a good quality Water Flosser. Check out our Water Flosser Review, and know the current top picks.

Along with the right usage, it is equally important to maintain and clean waterpik water flosser.

Now, flossing using the water flosser is not among the traditional ones. The standard flossing is the one where the dental floss is used. So, if you perform brushing and dental floss, then you need not substitute the dental floss with the water flossing method.

But definitely, you can make use of this water flosser as a supplementary task along with the standard method. The water flosser will handle the portions which the dental floss can’t deal.

We would like to conclude this post on How to Use a Water Flosser here. Hope this guide proved to be helpful and made you aware of the complete handling technique. In case of any query, post them in the comment section below. Follow us on WaterGadget for more such informative stuff!

Filed Under: Water Flosser, WaterGadget Blog Tagged With: Water Flosser

How to Clean Waterpik Water Flosser

April 14, 2017 By Water Gadget

All kinds of appliances require some maintenance else; there will be a decrease in efficiency. Same is the case with the water flosser products, where you will find mineral deposit formations on it.

So, it is necessary to perform regular maintenance of the unit; otherwise, you may find problems like a decrease in pressure, and effectiveness.

Getting into the Cleaning work for Waterpik Water Flosser, it mainly includes four steps. It is recommended to perform this process within a period of 2 or 3 months. This will help in boosting the overall performance of the product.

How to Clean Waterpik Water Flosser

So, as we mentioned before, the cleaning process is divided into four main steps, and they are as follows:

  • First, you have to clean the water reservoir
  • Then, wash the internal parts of the system
  • Clean the handle, and this is applicable for the countertop models only
  • Finally, wash the flosser tip

Well, these were just the headings to brief you about the processes included in cleaning one Waterpik Water Flosser. Find out what our experts say about Waterpik Ultra Water Flosser Review. Waterpik Water Flosser

Note. We are explaining the cleaning process for the Countertop Water Flosser Models.

Do It Right – How to Use a Water Flosser?

Clean the Water Reservoir

Lift the reservoir carefully. You will find one black reservoir valve here, remove it by pushing it from the bottom side. Wash this valve under warm water for around 45 seconds, and set it to dry.

After you have washed the reservoir, place it in the dishwasher area. It is better to let the component air dry instead of passing it through a heated dry machine. Join the valve back with the reservoir.

Turn for the Internal Parts of the Flosser

You have to make one mixture of 2-4 tablespoons of white vinegar, and around 16 ounces of warm water. Fill this solution into the reservoir, and run the system till the content reduces to half.

For this, you can also point the handle towards the sink. Finally, wash the reservoir with lukewarm water.

Read | Best Water Flosser Review – Top 10 Picks of 2018

Washing of the Flosser Handle

First, you have to remove the flosser tip using the Eject button. Then soak the complete flosser handle in a white vinegar solution for about 5-7 minutes.

Finally, rinse the handle using warm water.

Flosser Tip Cleaning 

It is similar to the process discussed in the previous step. Here you have to soak the flosser tip in white vinegar or hydrogen peroxide solution for about 5-7 minutes.

Then, you have to wash this flosser tip with warm water.

Experts have recommended replacing the Flosser tips after 3-6 months of usage period.

We hope that this article solved your query on How to Clean Waterpik Water Flosser. If you got any tips related to the flossing technique or facing any difficulty, then feel free to ask them out in the comment space given below. For future updates, do a follow on WaterGadget Blog!

Filed Under: Water Flosser, WaterGadget Blog

How To Drain A Water Heater? – Flush Water Heater

March 18, 2017 By watergadget

All the water heaters possess large sized tanks as the storage unit for water. With this large capacity tank, the heater thus can generate a large amount of high-temperature water. This insulated water holding tank can fulfill all the requirements for all the users in the family or home. But all the water that comes inside the heater container is not clean and pure. Hence there are chances of sedimentation in the inner parts of the tank due the impurities and salts that are present in the water.

This sedimentation not only corrodes the inner part of the water heater but it even decreases the heating efficiency of the heater and moreover consumes more power to heat the similar amount of water.How To Drain A Water Heater

Thus the sediments and salts that are gathered inside the heater reduce life, efficiency as well as the capacity of the water heater. You may find personal-sized heater easy to use and worry-free.

How To Drain A Water Heater

This installation of salts and the sediments that are on the inner part of the water heater can interfere and disturb the efficiency of the burners as well that are present in the gas water heater and can eventually be the reason of cracking.

You can even hear the popping noise when the heating process is going, this is due the impurities that are present inside the tank. Hence the quality of water that is used for heating in the heater plays an essential role in the water heaters life and processing efficiency.

Know | How Long Does a Water Heater Last?

The mineral content of the water is the key of sedimentation and salt installation. You can find our Recommendations for more clarity.

Thus, both the electric as well as the gas water heater should be taken under the cleaning or say flushing process every third year.

This can increase the life of the water heaters and apparently reduce the cost due to high power consumption as it will lead to better processing efficiency after flushing or cleaning is done.

It is recommended by the experts to flush off the heater and remove the salt installations and all other sediments if the water that is coming to your home is not clean or contains large amount of minerals.

Know Why Flushing Is Required In A Water Heater

Please take due cautions and work carefully while doing this process. Do not be lethargic or lazy as it may lead to serious damage. Read carefully and follow the same properly. Here are some Recommendations as to how to drain your water heater.

Step 1: Turn off the supply

The first thing that you need to do before flushing the heater is to turn off the water supply by closing the main supply valve that delivers water to your entire house. If you forget to do so or ignore doing it, it may result in the creation of a splash pool in your entire house. So better turn off the main supply before moving further.

Step 2: Turn off the power

The next thing is to become cautious. Water and electricity together are the worst nightmare which can result in catastrophic events which you would never wish to happen. Thus switch off the water heater before you flush it off. Moreover, the recommended guideline is to switch off the main power switches as well, before flushing off the water heater.

And for the gas water heaters, you can turn the thermostat to the pilot settings.

Step 3: Attach a hose to the drain valve:

You would not want the tank water to scatter all over the floor in your entire house and to prevent this you need to collect the drain water properly. The use of hose is the perfect way to drain and collect the tank water in any other container. You can even end the hose in the drain line in your bathroom or any other drain line and this will drain all your tank water directly into the drainage system. No extra work or spoiling of floor takes place if you use a hose to do the work.

Also, check out Best Water Heater Reviews of 2018 – Buying Guide

Step 4: Open the nearest tap

Now after installing the hose on to the drain valve what you require to do is, turn on the tap which closest to the water heater. By doing so you will create a high amount of pressure inside the water heater which would result in faster drainage of water. The pressure difference will help you to drain the water with at force which as a result will clean the water heater tank properly.

Step 5: Open the drain valve

Now slowly open the drain valve and make it completely open to drain away all the water. Please be careful while doing so, as there are chances that there might be hot water inside. So take care while draining the water tank. After the tank water is drained you can do the same steps that you performed till now, that is to fill the tank again with water by turning the main supply on and drain it again the same way.

Do not forget to close the drain valve when you are refilling the tank. And as you will perform this for three to four times the tank will be cleaned and sediments will be removed. Or else do the same process until the clean water comes out.

Check It Out: How to Replace a Water Heater? | Expert’s Recommendation

If you experience slow drainage speed or no water drains from the heater tank then assume that the drain valve is blocked and here you need and expert to do the remaining work.

Step 6: Close the drain valve and turn on the water heater

At the end do not forget to close the drain valve. After closing the drain valve refill the water tank by turning the main supply on. Check whether cold water coming through the tap that is connected to the water heater and if it is coming then close the tap.

Now remove the hose pipe from the drain valve and see to it that the drain valve is completely closed. Later turn on the water heater. If it is a gas water heater turn the pilot back to the on position and if the water heater is electric then turn the supply on.

Check our website to read more similar DIYS and other product reviews.

Filed Under: Water Heater, WaterGadget Blog

How to Install a Water Softener – The Ultimate Guide

February 16, 2017 By Water Gadget

Here we will provide you with a detailed info on How to Install a Water Softener. Also check out the necessary information about the handling of the softener system.

Hard water has been causing trouble to the home appliances for a long time now. Water with high levels of calcium and magnesium results in hard water. To reduce the hardness in the water, people decide to buy a water softener which will help you solving the issue.

There was a time when people bought considered this product as a luxury. But now with passing time, it has become more of a necessity than a luxury. We will begin with the introduction of the Water Softener technology and check on the installation procedure.

What is a Water Softener

The process of softening is defined as the removal of the calcium, and magnesium ions from the water. These are the hardness causing elements present in the water. The softened water can mix up well with the soap water, creating the right kind of foam. Thus the life of the water-related equipment is maintained with the softener. You must check out various positive Water Softener Reviews to find a good system which fits all your needs.What is Water Softener

Mainly the hardness causing element in the water include bicarbonates, chlorides, and other sulfates. These can cause limescale buildup within the pipes, and also damage many household appliances like washing machine, water-taps and much more.

Recent updates: Water Conditioner vs Water Softener | Know the Difference

To remove the hardness, water softener system must be preferred. And most of them include ion-exchange resin method. Here, the calcium and magnesium ions are replaced with the sodium ions. Thus the resulting water will be salty in nature.

For those people who are not allowed to consume salt in their meals, should refrain from using the regular softener system. Instead, they can prefer the Best Salt-Free Water Softener Systems, which performs the same task as other water softener system.

Check the Fleck Water Softener working on this – Fleck Manual

If you have got hard water at your place, then it is recommended to treat the water as soon as possible. This is because hard water accompanies other water issues like the taste and the smell of the water is also altered significantly.

How to Install a Water Softener

The level of difficulty varies not only from one machine to another. But there are many other factors which affect the installation of the water softener. Some of them include the type of the pipes used in your area, the location at which you wish to install the unit, etc.how to install water softener

The types of water softener found for the softening purpose are salt-free, salt based, magnetic, Reverse Osmosis, and also a whole-house unit. The magnetic ones are the easiest for installing, while the hardest is the whole house unit. And the whole house unit requires the need of an expert installation.

Here, we will check out the steps for installing water softener unit in a Do-It-Yourself kind of manner. But before this, you need to be equipped with some instruments for the installation.

These machinery tools required for installation of a water softener are Pipe cutters, two union fittings, Teflon tape, two compression settings, gate valves, torch and solder, tubing or copper pipe, tape measure, PVC solvent or flux, flexible tubing, a pipe wrench.

Now we will list out the steps for the installation of a Water Softener system:

Steps of How to Install a Water Softener
1Turn off the water supply from the main line. You need to drain out the pipes at your home by just opening the lowest valve, to let the water be removed entirely.
2Turn off the water heater systems, and also the power which leads the connection.
3Then you have to decide the place where you want the water softener to be set. The connection should be made in such a way that the softener unit is positioned before the line feeds to the water heater.
4Then you need to make a cut on the main line, using the pipe cutter. Place the cutter on the tube, then rotate it all the way around it, till you cut the pipe. If you find any amount of water getting during this process, collect it using a bucket.
5Next step will be to get an elbow setting done on the pipe. You have to set up this fitting if you want to feed the filter, and also you could build a bypass valve to feed through the filter whenever you wish to do this.
6Take the measurement of the pipe which leads to the bypass valve from the main pipe. So you need to cut the pipes accordingly and do the needful soldering before you connect both the pipe and the bypass valve.
7Now you have to connect the hose to the water softener, by making use of the compression fittings. And this mostly comes with the unit itself.
8Next, you have to clamp the hose with the unit. Then place it till the place where you wish to drain the water softener system. This can be a utility sink, floor drain or any pump kind of structure. The end part of the hose must be placed in such a way that it leaves a gap of 2 inches from the drain hole. Here you need to make sure that the tube is tightly clamped.
9There is an overflow tube in this, and you need to connect this hose with the brine container.
10Place the valve in the bypass arrangement, and let the water flush through it. This will help in removing any sand or sediment present in the pipe.
11And finally, plug the unit, and then set backwash position on the valve found in this.

So, these are the steps that need to be followed for setting up the water softener system at home. And, for whole-house unit installation, it is recommended to hire some expert for this.

Also, check: On the Go Water Softener Reviews 2018 | Comparing the Best For You

Water Softener Troubleshooting

Is your water softener not working properly? If you find any decrease in the performance of the system, then there is the need of some fixes. Now if you have got the old unit, and none of the tips explained here works for you, then you need to make a replacement of the water softener.install water softener

We will list out the three steps that need to be followed for performing troubleshooting. They are as follows:

Check for any issue with the salt- Here you have to test the condition of the salt in the brine solution. You can make use of a broom, and break the salt domes if formed within the tank. Do check out the exact working process of water softener.

When you add salt to this solution, the salt won’t dissolve well here, and thus the softening process will be affected by this. So clean the brine tank, to get the water softener system running back correctly.

Wash the Resin bed properly- Clean the resin bed twice a year, and for this you have to make use of a resin bed cleaner. This is a kind of solution which has to be poured into the resin bed, and then the tank is washed with warm water.

Clean the Venturi Assembly- This is the region through which the brine solution passes through the brine tank to the resin tank. If you find the screen, and the nozzle is clogged with sediments, then hard water will never be softened properly in this system.

Other user guides: How Does a Water Softener Work? – Everything Included

So these are the steps through which you can try troubleshooting your water softener unit at home. If you have got the water softener system running back to normal, then share the tips among your friend circle. And if the issue persists, then let us know by mentioning the problem in the comment section below.

We believe that you are now clear with the steps on How to Install a Water Softener. So all set to rock with the newly installed softener? For regular updates on other water solution systems, follow us on WaterGadget.com.

Filed Under: Water Softener, WaterGadget Blog

Water Filter Guide | Everything Included

February 9, 2017 By watergadget

One of the essential elements needed to sustain life, Water also needs some maintenance from us. Water Filters is all about we are going to see in this article, which is equally required for the maintenance. If the liquid that we use, is not in a healthy condition it can cause harm to us. To solve this issue, came the water filter mechanism which can help in removing a significant amount of chemicals and pollutants present in the solution.

These water filters not only purify your water but also remove any foul smell if any present. Now if you want to get the maximum benefit of the water filter mechanism, you need to choose the best filter among the available filters in the market. So we are writing this article to lower that search-task by displaying the most efficient filters for you.

There are different kind of water filters available according to the need of the user. Make a proper study of your need and choose the best-suited one accordingly.Types of Best Water Filter

Type of Best Water Filter

The water filters have been classified based on where and how much water is to be purified. These types are:

Reverse Osmosis System – RO system uses a membrane for filtering the water and removing any pollutants from it. It is also found that RO is joined with Powdered Activated Charcoal that is used for reducing the chlorine level in the water. This semipermeable membrane filters out many particles which have a larger size than water and gives out clear water after it is passed through the membrane. In this process, some amount of water is also removed which causes wastage. For water filter process of contaminated water, this one is a good choice, but it fails to provide a reduction of Volatile Organic Chemical (if carbon filters not included). And the filtration process can take a lot of time. Also, the water filters are needed to be often changed. Read the reverse osmosis water filter reviews.

Activated Carbon Filter – In this filtration system, carbon with high absorption rate is used. This carbon is positively charged and is used in filtration of impurities. The types of filters included in this are, under the sink, countertop and also as tap filtering system. These kind of filters are good at improving the taste of the liquid, in removing any odor and also the smell of chlorine. This water filter system is very much effective in reducing the pollutants, which include some heavy metals also like lead, mercury and copper, and also pesticides, VOC(Volatile Organic Chemical). Read the activated carbon water filter review.

Distiller – This water filter system works by boiling the solution and performing re-condensation on the purified steam. The distillers can be used for almost every unit of house needs. One of them is Countertop Distillers. These distillers are efficient ones, but they take some amount of extra time to distil the solution. They work on electricity, dissipate heat and some of the fans included in the machine, makes noise also. We will see two types of Countertop Distillers. Read more on distiller water filter review.

  • Megahome Countertop Distiller: There are many water filter kind of distillers that are sold under this brand name. Even if they are less expensive, there are a lot of products of this brand available. It can provide one gallon of water in five hours. The connections through which purified solution passes is sealed. Therefore, the possibility of water getting contaminated due to air is reduced. The stainless steel unit is also attached so that it can be easily cleaned by the user.
  • Waterwise Countertop Distiller: This works more efficient than the previously mentioned filter. This filter can produce one gallon of water in four hours. Rated as one of the excellent water filter choices.

Ultraviolet Disinfection – As the name says, the ultraviolet light is used in water filter process. These units are installed under the sink and also include carbon filters which help in removal of any pests and microorganisms if present.

The Right Water Purification System for Water Filter

As you are going to choose the right purification system as per your need, you have to consider a lot of points before deciding the system. The main parameter to be considered is the quality of the water in your area. Considering the choice of the water filter system, if you are going to buy a comparatively large system, you need to take some help from the system officials with the installation. Otherwise if dealing with smaller systems, you can handle it on your own.

Water Purification System
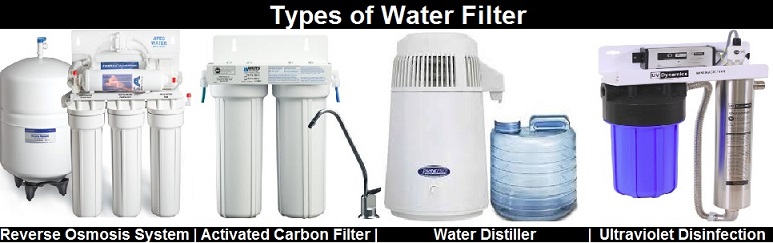
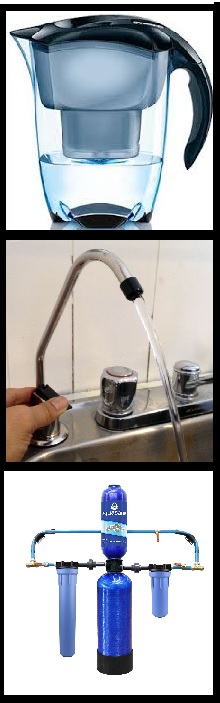
Based on the requirements, we have classified filters in 3 categories. They are:

  • Pitcher Water Filter – In this purifier system, charcoal is the primary player who performs the filtration. Charcoal in the form of granules is used in this, which helps in removing the pollutants. This investment is one of the economical ones and long lasting also, but such water filters still require a usual change of cartridge within some time.
    They are helpful in improving the taste of the solution. Here the carbon is not in the solid form, so it may not be able to clean the toxic completely from the solution. They are useful in reducing the chlorine contents, still is not much suitable for home usage. Read the pitcher water filter review.
  • Faucet Purifier System – This is for such cases, where the solution that is used for bathing, cleaning clothes and other uses is in good condition. But the one used for drinking purpose needs to be more purified.
    In this water filter system, a small device is placed on the tap and with just one click you can get filtered solution from the taps. This system usually contains three-step processing, which includes sediment, KDF and activated carbon filter. Read the faucet water filter review.
  • Whole House Filter System – In those cases where the quality of solution used for almost all purpose is of very low quality, then this option should be considered. This water filter system is comparatively high in cost, but then its efficiency is a lot better than the previously mentioned filters. These filters can place at the point of contact where the supply valve is getting connected with the house.
    These filters are capable of removing minute particles also. The water filter system runs for a long period and performs hard before actually needing a replacement. Read the whole house water filter review.

Contents of Waters and Drawbacks of Bottled Water

Do you know, there are about 310 chemicals and pollutants present in the water according to the Environmental study. Now some of the main pollutants found in water are:

  • Volatile Organic Chemical – This content is found in fertilizers, pesticides. It is found that most of the municipal water resources contain this pollutant. They can damage the liver, reproductive system and also kidney functioning.
  • Fluoride – This element has been in debate. The consumption of fluoride can help in teeth benefits, but the drinking of fluoride has not been much beneficial, though. This component has been responsible for thyroid affecting cases.
  • Heavy Metals – They mainly include Mercury and Lead. Responsible for many health issues.
  • Endocrine Affecting Chemicals – This may be responsible for the improper working of the hormones in the body.Drawbacks of Plastic Water Bottle

So what is your escape from using this kind of water which is full of contaminants?

You may say one option like bottled water. But some of the points to be considered in this:

  • Bottled water is a good choice, and also one of the cleaner options. Still, it is not the better choice because of some limitations found in this.
  • The chemicals found in the plastic bottles is found to be exploiting the solution content badly.
  • There is no surety of the water quality inside the cylinders, and sometimes it would be same tap liquid.
  • By use of bottles, you are adding more of consumer waste.
  • The cost of bottled water is more than the standard tap solution using for drinking purpose.

Is there any difference between Reverse Osmosis Systems and Water Softeners?

One of most used water filter system that is adopted by many people, even for homely needs is the RO system. RO stands for Reverse Osmosis. In the RO system, pressure is applied to the flow of fluid for purification. The pressure causes the liquid to pass through a semipermeable surface, which helps in accumulating all the solid particles and pass the purified solution out of the surface.

RO devices work very nicely, but it is not suitable for the liquid softening purpose. They are more of water filter and less of the water softener. RO system can be used for treating solid solution sometimes, but it is mainly designed for the liquid purification purpose. So if you want to purchase some device for softening the liquid, this does not serve the purpose.

Also to mention, the RO system and the faucet filter both of them has this filtering of water in it, but still the RO system has comparatively more complicated than the faucet filter. Therefore, reverse osmosis is more of water filter and also it is practically not advisable to use this system for softening of the solution.

5.0 Stars
Amazon Reviews

List of Product Standards by Technology

These are the seven NSF/ANSI standards that are suitable for home usage systems:NSF Standard Water Filter

  1. Filtration: This comes under NSF/ANSI standard number 42 and 53. Carbon filters are used in this mechanism. The pollutants are also decreased for collecting the contaminants in the water filter. The contaminants can be absorbed or broken down also depending on the making of the system.
  2. Water Softeners:  This comes under NSF/ANSI standard number 44. Under this criteria, the system uses the positively charged ions for replacement of resin, generated by potassium chloride or sodium chloride, thus reduces the hardness of the liquid. The minerals replace the sodium/potassium ions which depend on the pellets that are used in the system.
  3. Ultraviolet (UV) disinfection:  This comes under NSF/ANSI standard number 55. Under this standard, the UV rays are used for water filter process or removal of any organism that depends on for food from other entities from the solution.
  4. Reverse osmosis:  This comes under NSF/ANSI standard number 58. In this, the solution undergoes the unnatural flow of liquid. That is, the liquid is passed through a more dense liquid to the less dense fluid which in fact passes through a semi-permeable membrane. Now for such systems, pre and post filters are also present, near to the membrane.
  5. Distillers:  This comes under NSF/ANSI 62. In this simple water filter system, the liquid is boiled and then the vapor of the same is collected, then it is condensed. This water filter helps in removing most of the heavy metals. Some of the pollutants will be converted into gaseous form.
  6. Shower Filters:  This comes under the NSF/ANSI standard number 177.  The water filter system is used in residential areas and is mainly designed for reducing the chlorine quantity in water.
  7. Treatment options for the increasing contaminants: This water filter process comes under NSF/ANSI standard number 401. This system is covered in many of the point-of-use and point-of-entry and has been proved that almost 14 pollutants remain back in the solution after the water perform this process.

So here we are at the end of our topics Water Filters. Consider the water filters reviews according to the need, for example, if you need a filter for drinking water, a tap filter or any other simple filter is recommended. Don’t waste money on the filters which you don’t need, so find the need and make a good choice. If you have got any questions regarding any of the water filter mentioned in the post or you can go from here, to clear them out by saying it in the comment section of WaterGadget!

Filed Under: Water Filter, WaterGadget Blog Tagged With: water filter, water filter guide

Water Softener Maintenance – Different Ways

January 31, 2017 By Water Gadget

We will provide the steps for Water Softener Maintenance – Different Ways, and also discuss various aspects related to it. If you are living in an area with hard water, then buying one softener is recommended for you.

If the continuous use of hard water is done, then you will notice limescale buildup on pipes and other water softener systems. Also, the clothes start fading, and also white patches are found on the kitchen utensils.

The modern water softener works efficiently and lasts long only if proper maintenance is provided to it. You need to conduct regular checks for extending the lifespan of the unit. Let’s get into the steps which are to be performed for a maintenance check.

Water Softener Maintenance

There are three divisions present in the Maintenance process for Water Softeners. And within each division, you have got the steps to perform. The primary task divisions are:Water Softener Maintenance

  • Working on the Brine Tank
  • Clean the Brine Tank
  • Additional Care

Let’s begin with the first phase of Brine Tank Check. Following are the points which are to be followed while dealing with a brine tank:

I. The level of the salt is checked in the brine tank, once in a month. Salt is an essential thing in the process of water softening, as it is the only thing responsible for softening.

And regeneration helps in preparing the resin beads to handle the hard water more efficiently. The salt solution is present in the Brine Tank, for the restoration process, and there is a pre-determined level of the salt in it.

For this, you can refer the water softener manual to know the level of salt allowed for the Brine Tank. It is required to fill the tank with at least half of it with salt. Also, make sure you fill the salt such that it is 3 inches above the water level.

You can increase the amount of salt in the brine tank since it increases the efficiency. But try to reduce the salt, if you find old salt starting to cling to the side walls of the tank.

Read | What Water Softener Salt Is Best To Use?

II. Next, you need to know the type of salt which is best for your water softener. The water softener system mentions the type of salt suitable for it, like granular, pellet, etc. The granular one is the most preferred one since it dissolved in the water easily. It is recommended to go wit the pellet type, as this helps in reducing the clogging issues.

III. Break down the salt bridge if any present. This creates the problem like salt not getting dissolved properly which results in low performance of the water softener. You can make use of a broom, and mix the bottom area of the tank, to break the salt bridges if any.

IV. Check for any mushy structure of salt formed at the bottom part of the tank. You can make use of a broom for handling this issue too. Remove if any present.

Other reads: Northstar Water Softener Reviews – Top Picks 2018

Next task division is Clean the Brine Tank. And the steps include in this are:

I. The major advantage with the current water softener is that they can go without cleaning for many years. So if you notice some difference in the water softener system, then it is the signal for cleaning the tank. Schedule one day for performing the cleaning process.

II. Next step is to empty the tank. For this, first, you need to stop the water intake. Now follow the siphon method or just remove all the water from the tank. Here you have to remove the salt contents too, if any present.

Check this useful source for Waterboss Water Softener reviews.

Don’t dispose the water to the garden, as the salt from the water softener can damage the plants badly. It is better to dissolve the salts in hot water.

III. There is a brine grid in the tank. You need to take this grid out in this step. Some water softener systems have got a platform like structure in the brine tank. You have to put this aside for a while for cleaning the tank.

IV. Take 1 or 2 gallons of water, and mix the considerate amount of soap into it. Pour this solution in the tank, and then using a scrub rub the interior of the tank. It is recommended to use a long-handled brush for this purpose.

V. Wash and rinse the tank with plain water. Then you can use bleach to sanitize the tank. Add 60ml of bleach and water (2-3 gallons), and keep stirring for 15 minutes.

VI. The final step is to rinse the water softener system again. Place the grid back, if there was any in the tank. And, finally, refill with salt water solution within it.

Check our review: Fleck 5600sxt 48000 Digital Metered Water Softener

Here ends the second task division. Keep in mind that following regular Water Softener Maintenance is necessary for long life on your product.

GE is yet another popular brand in the softeners, so you can take a look on their Top Picks too. [reference]

Some additional steps which can be performed for complete water softener maintenance. They are explained in the following section:

I. Work with the valves on the water softener. The bypass valve is similar to the rod in structure, and they are used for blocking water flow. Try to twist the pipe for intake and outtake valve for stopping the working of them. Then place the pipes in their old position, and continue with the work.

II. Make use of water softener cleaner. Using this, you can flush the brine tank once in a few months. Follow the instructions that are given on the softener cleaner solution. In the end, you will be able to use the resin completely, and in the right way.

III. Clean the valve between the resin and brine tank in a water softener. When you wish to add water to the regeneration chamber, the nozzle, and the Venturi Assembly comes into action. These settings help in making a suction system.

You need to disassemble the parts, and clean them at least twice in a year. This has to be performed when the brine tank gets clogged. You can follow the instructions which are provided in the manual. Make sure that all the water pressure within the water softener is removed before disassembling. Otherwise, it may cause damage to the unit.

You can have a peek at this article to get a deeper knowledge on Water Softener parts.

IV. This point is for those, who have tried out each way explained above still getting hard water. Try to perform some other troubleshooting techniques. And they are:

  • Check that the bypass valve is not closed with the regeneration time set on it.
  • If the water usage has increased or you find the hardness has increased, then perform regeneration process.
  • If the digital display is not working properly, then check for the power supply. Also, check if the wires are intact in the water softener.
  • The final way is to hire some expert to examine the machine for you.

So these are the steps of water softener maintenance that you can perform on your own if you wish to troubleshoot the water softener system by yourself. We believe that you have understood each division listed here, and all the processes which are included in each division.

You can find out my review here for the NuvoH2O Water Softener systems.

We hope that this article on Water Softener Maintenance – Different Ways assisted you in the right way. If you have got any question regarding the steps explained here, feel free to post them in the comment section provided. For more updates visit here!

Filed Under: Water Softener, WaterGadget Blog Tagged With: Water Softener Maintenance

  • « Previous Page
  • 1
  • …
  • 7
  • 8
  • 9

Popular Post

Best Water Softener Reviews 2020 – Our Top 10 Picks!

Featured Posts

Best Watering Globes Reviews – Top Picks for 2020

Best Gas Pressure Washer Reviews of 2020 – Buyer’s Guide

Best Water Pressure Gauge Reviews of 2020 – Recommended by Experts’

Fleck Water Softener Reviews of 2020 | Fleck 5600SXT

Culligan Whole House Water Filter Reviews – 2020 Guide

Best Reverse Osmosis Water Filter Reviews | Buyer’s Guide 2020

Best GE Water Softener Reviews | Complete Guide

Best Water Filter for Frigidaire Refrigerator Reviews of 2020

On the Go Water Softener Reviews 2020 | Comparing the Best For You

Top 10 Best Water Dispenser Reviews of 2020

Copyright © 2025 · WaterGadget

Amazon Affiliate Disclosure

WaterGadget is a participant in the Amazon Services LLC Associates Program, an affiliate advertising program designed to provide a means for sites to earn advertising fees by advertising and linking to amazon.com.