WaterGadget

Reviews with Comprehensive Guide

  • Home
  • Water Softener
    • Fleck Water Softener
    • Portable Water Softener
    • Water Softener Shower Head
    • Salt Free Water Softener
    • Water Softener for Well Water
    • Water Softener Salt
    • Potassium Chloride Water Softener
  • Water Heater
    • Personal Heater
    • Patio Heater
    • Tankless Water Heater
    • Space Heater
    • Forced Air Space Heater
    • Infrared Space Heater
  • Water Filter
    • Water Filter Pitcher
      • Pur Water Filter Pitcher
      • Brita Water Filter Pitcher
    • Under Sink Water Filter
    • Inline Water Filter
    • Countertop Water Filter
    • Faucet Water Filter
    • Refrigerator Water Filter
    • Reverse Osmosis Water Filter
    • Whole House Water Filter
  • Product Reviews
    • Water Dispenser
    • Water Flosser
    • Water Ionizer
    • Water Hose Nozzle
    • Water Glasses
    • Waterproof Cameras
    • Water Sprinklers for Lawns
    • Watering Can
    • Watering Globes
    • Watering Wand
    • Water Table For Kids
    • Water Boiler
    • Water Bottle
    • Water Distiller
    • Water Shoes
    • Water Timer
    • Gas Pressure Washer
    • Water Alarm
    • Water Pressure Gauge
    • Pet Water Fountain

How to use Watering Globes for Plants – Tips & Tricks

March 9, 2020 By Water Gadget

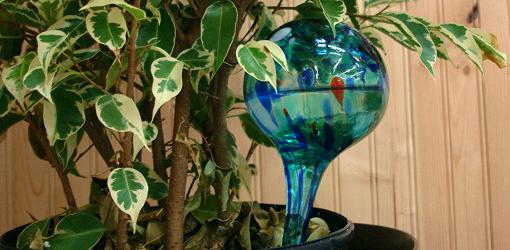
Water is one of the essential sources that is necessary for the growth of plants. If you are not having that much time to regularly provide water to the plants, then watering globes are a type of blessing for you. Here, we will discuss in brief the tips and tricks on How to use watering globes for plants.

The watering globe acts as a lifesaver for plants as it continuously provides water to them. You just have to insert the water globe into the soil and the plant will receive a small amount of water for up to one week. This will help in maintaining the moisture in the soil and ultimately the life of the plant.

How to use watering globes for plants?

There are no other substitutes of the watering globes to take care of the plants. Also, it is advisable to clean this appliance at a regular interval of time. And if you are going to buy a watering globe for your home or garden, then you must read the further section of this article.

How to use watering globes for plants

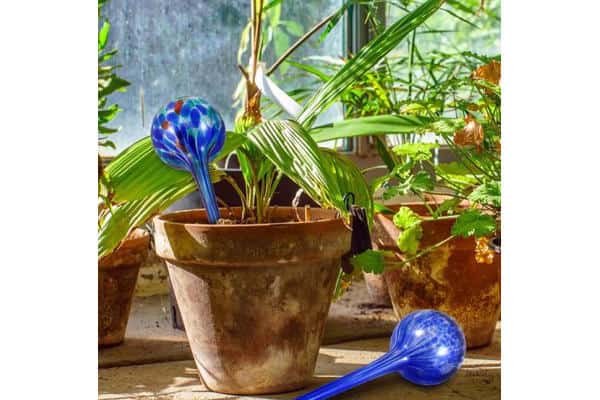
The watering globes are a very convenient and effective way to keep the soil moist for a long time. It can easily provide water to the plants for up to one week or two. If you are using the water globe for the first time, then you can follow the below steps that briefly shows how to use the water globe.

  • Fill the water globe
    • Firstly, you have to fill the globe with the water. For this you can use any method, you can use a jug to pour the water or directly fill the globe from the tap.
  • Place the water globe into the vase
    • You have to make a damp in the soil in order to insert the water globe in the vase. Now you might think that how deep you have to place it into the soil. This totally depends on the size of the water globe that you want to insert in the soil.
  • Prevent the water globe from getting clogged
    • If you directly insert the water globe into the soil, then the soil may get pushed inside the tube. So, you can make a hole in the soil with a pen or a knife. This way the soil will not enter the tube and help the water globe from getting clogged up.
  • Regular cleaning
    • It is advisable to clean the watering globes from time to time. You can use hot water or baking soda to clean the tube and other parts of this watering system. Also, it is necessary to replenish the watering globe every week or two.
  • Watering globes for sensitive plants
    • You can also use this system for the sensitive plants that cannot go without water even a day. For this types of plant, the watering globes are very effective. This will help to provide a stable flow of water to the plants.

The watering globe is very convenient in maintaining the health of the plants. Besides using the watering globes, it is also important to take extra care of the plants. Even after using the watering globe, the plant shows sign of wilting, then it is desirable to change the pot of the plant.

The above are some of the tips and tricks on How to use the watering globe system. We hope that these gardening tips are effective for your houseplants. If you are having any query regarding this, then you can contact us at Water Gadget. We would love to hear your thoughts and feedback on this subject. Thank you.

Filed Under: WaterGadget Blog, Watering Globe

DIY Outdoor Water Table with Pump for Kids – Popular Methods

March 3, 2020 By Water Gadget

Getting your child outdoors has become one of the important need. Only then, they will be able to come close to nature and understand different life principles. Outdoor Water Table has been doing pretty well these days, and has become a favourite play-time in many homes. Read the complete DIY on how to make this table with all your basic home tools.

DIY Outdoor Water Table with Pump for Kids

Water Table is one of the fun outdoor games preferred by all the kids who love playing with water. It is mainly played by the toddler babies, and built with soft materials keeping the safety in check. Surprisingly,  you can build one such table at your home if you have got all the tools at hand.

DIY Outdoor Water Table with Pump

These days, water tables come at a high cost; with some guidance and basic tools you can make one at your home! We will list out the tools required for this task and then get into the steps.

Step 1: Get the Tools Ready!

Following are the tools needed for constructing an Outdoor Water Table-

  • Polyethylene Water Pipe made from plastic (3/4″ x 5′)
  • One insert plug (3/4″)
  • Elbow Insert (3/4″ 90D)
  • Statuary Pump (with 330 gph)
  • Tee Insert (3/4″)
  • Vinyl Tube (3/4″)
  • One storage bin made of plastic with the lid on it
  • Hand Saw
  • Power Drill
  • Drill bit of different sizes
  • Knife

This is the number one step, as only with the right tools you could get the job done in the perfect manner. After you are set with this, we will get into the making of Water Table.

Step 2: The Drainage holes and some Plumbing work

Get the lid of the storage bin, and start making holes on it. 4 to 5 medium-sized holes will do the job. This is necessary, as we don’t want the water to pool on the top of the storage bin. With these holes, all the water coming from the fountain will get back into the storage bin via these holes.

Next comes the plumbing assembly, cut about 2 inches length of the black pipe using the hand saw. Get the three tee inserts and four 90D elbow inserts connecting to get the plumbing structure.

Step 3: Drilling for the Fountain mechanism. Then work on the Fountain components.

Now you have to place the plumbing structure created in the previous step on the lid portion of the storage bin. Mark the points again on the storage bin, and increase the diameter of the holes made. The holes must be a bit large than the black pipe’s diameter.

Get hold of the remaining black pipes, and separate them into six different pieces. Among the six pieces, 4 of them gets the insert plug, and the other 2 gets the 90D elbow inserts. You will end up with four vertically designed fountain pipes.

Step 4: The Power Cord setting, followed by the Pump Placement

Drill one hole on the side of the bin, just below the rim location so that the pump’s cord could easily pass through this opening. Then make a vertical cut through this hole to the top of the rim.

The Power Cord setting

Get the pump set, with the power cord on it. Let the power cord pass through the hole created on the storage bin, and then place the pump on the bottom portion of the storage bin. With the help of vinyl tubing, set the plumbing assembly (created in step 1) on the top of the pump setup.

Step 5: Some more Assembling process, and making holes in the Pipes.

Remember six fountain pipes created in the 3rd step; you need to set them up in a way that it passes through the holes of the storage bin. Let the fountain pipes to pass through the holes, and then connect them to the plumbing assembly placed on the bottom side. Place the lid slowly, and make all the adjustment required. Just ensure that these fountain constructs are in a vertical position.

We are almost done, you need to drill some holes in the plug inserts. The trick here is to make small holes. If the holes get large, then there are chances that you may lose the quality amount of water pressure. Take it slow, keep the number and the size of the holes –  both less.

Step 6: DIY is Complete. Time for the testing & Quality Check!

Fill the top of the storage bin with a considerable amount of water. You can directly pour water into it, or fill the water with the help of the hose connections. Check the plumb setup, and examine the water pressure available. If the pressure is too high for the need, then unplug the pump and increase the size of the hole.

Keep the process on, and continue with the pressure test till you get the right one.

Was this post helpful and informative for you? Comment on your answers below. Follow us on WaterGadget for awesome updates!

Filed Under: Water Table, WaterGadget Blog

How to Remove a Stuck Water Hose Nozzle

February 17, 2020 By Water Gadget

Often a situation arises that stops the working of our equipment. The stucking of a Water Hose Nozzle is among such circumstances. The present article on, How to Remove a Stuck Water Hose Nozzle relates to the solution for this problem. Seldom we require using various accessories with our garden sprayer. But, if the water hose nozzle gets jammed, then the changing the accessory from the sprayer becomes a tough task for us.

Therefore, there is a need for properly determining the procedure of How to remove a Stuck Water Hose Nozzle! Kindly go through the article and learn about the procedure in brief. There isn’t any kind of need for expertise for solving this issue.

How to Remove a Stuck Water Hose Nozzle? – In 5 Easy Steps

Here is an in-depth procedure for those who are trying to get the answers on How to remove a Stuck Water Hose Nozzle? This procedure consists of the simple steps that you can carry out on your own.

How to Remove a Stuck Water Hose Nozzle

Stop the Supply of Water

First of all, we have to begin with obstructing the supply of water. This is a necessary step, because in case if the nozzle is removed, it will drain plenty of water that might make you wet.

Assuring the Safety

Well, safety is always the first preference. Hence, the person who is repairing the nozzle has to take care of these considerations. He must wear safety gloves for protecting his hands. Next, attach the pliers to the hose end fittings as well as on the base of the sprayer. Now, try to loosen the base by rotating it in all the directions.

Tapping the Base

With the help of a hammer, you have to tap on the base of the sprayer. If there is a presence of corrosion due to the moisture or water, tapping the hammer will remove all remains of corrosion. However, you have to be careful regarding the strokes you are making. Otherwise, it might damage the mechanism of the sprayer.

Heat the Garden Sprayer

Keeping the gloves on, now you have to supply the heat to the garden sprayer. You can use a hair dryer for the same. As soon as this assembly gets sufficient amount of heat, try to loosen the sprayer with your hands.

Removing the Water Hose Nozzle

If you’re done with everything, then the lubricant is the only option left with you. Spraying the lubricant in sufficient amount, you have to leave it for some time. Once it gets properly lubricated, you can remove the nozzle with the help of pliers.

Check out some great water hose nozzles!

  • Best Water Hose Nozzle Reviews

Summary

With this comprehensive article on, How to Remove a Stuck Water Hose Nozzle we have given a brief description of the steps you need to carry out during this situation. We hope that our compilation will be helpful to you for effectively removing the stuck water hose nozzle from the garden sprayer. For getting more such kind of valuable information about Water appliances, stay connected with us on Water Gadget.

Filed Under: Water Hose Nozzle, WaterGadget Blog

Water Softener Parts: Guide for Beginners

February 16, 2020 By Water Gadget

There are many machinery parts which we will check out in Water Softener Parts: Guide for Beginners. You may have done a good research before choosing one right softener system for you, but very few know the machinery parts included in a regular water softener unit.

Water is used for drinking purpose, and we also make use of water for many other tasks. Mainly, water is used for transferring materials from one place to another since it is good at holding things.

water softener parts

This same water does not arrive with rules and other guidelines. So the after-effects of this will be visible on the utensils, and other household appliances which make use of the tap water. So buying a water softener is suggested in such case.

Water Softener Parts Explained

You will be well aware of the installation process, and the different water softener brands available for purchase. The components included in a softener, must be known to you. Keeping some system knowledge is appreciable, but it may also help you out while dealing with any issue.

There are total two tanks present in a water softener. One is the resin tank, and the other one is the brine container. The primary process of softening is done within the resin tank, and recharge process is performed via the brine solution.

Now we will list out the components which are included in a water softener, and explain the purpose of each part in brief.

An inlet valve for hard water entering- This is the hose through which the hard water passes through, and enters the processing chamber. It is important with knowing softener work style, along with the resin tank or the mineral tank present within.

Outlet valve for softened water- The next valve found here is the outlet valve. By the name itself you can understand the purpose of this valve. Through this valve, the softened water is passed for the household tasks.

Drain tube- After the softening process is completed, the water softener stops working with the calcium and magnesium ions on the resin beads. To remove them, regeneration process takes place where the brine solution is added to the mineral tank. Calcium and magnesium ions are removed from the beads, and they are drained out from this tube.

Valve and the timer assembly- Electric water softener has got the timer feature. This is that part of the system where all the valves and the timer forms a connection in the softener. Using this timer, you can perform regular regeneration process.

Mineral Tank/Resin Tank- This is the main container of water softener where the softening process takes place. You will find polystyrene beads in this tank, which are also known by the name of resin or zeolite. The primary process of ion exchange takes place in this container, and so you need to maintain the system rightly.

Outlet Manifold within the Mineral Tank- You will find a manifold kind of structure within the mineral tank. The manifold is a tube or pipe within which you will get smaller pipes or channels. The manifold has got a direction moving outside on this machine.

Plastic or the resin beads- These beads are placed in the mineral tank, in which the primary ion exchange process takes place. The calcium and magnesium ions present in the hard water get stuck to these beads because of the opposite charges on them. After the softening process ends, the beads are regenerated by brine solution.

Brine container- This container contains brine solution, it is simply a salt water solution. During the regeneration process in water softener, the brine solution passes into the mineral tank, to recharge the beads which are covered with the calcium and the magnesium ions.

Softening Salt- This section includes the Best Water Softener Salt which is present in the brine container.

Float and valve assembly within Brine tank- You will find this assembly in the brine tank system.

So these are the various machine components that you will get to see in a regular water softener. We have tried to list out almost all the parts included in the softener. [know more]

Also, read our detailed review on: Fleck 5600SXT

Working of the Water Softener System

Here we will provide you the working of the Water Softener here. We have mentioned about the machinery parts in the previous section. We will begin the complete process performed in a softener unit.

First, hard water enters the mineral tank through the inlet valve provided in the water softener. Now, calcium and magnesium ions present in the hard water attracts the resin beads present in the mineral tank. This way, the hardness causing materials are removed from the water which entered into the softener.

Here both the Calcium and Magnesium attracts the negatively charged resin beads. And the beads are covered with the weaker sodium ions, which is passed into the water. The trade of sodium ions are done by the resin beads in water softener, in replace of the hard minerals.

Thus, hard water minerals remain on the resin beads. After some time, you will notice that water is not softened rightly. This is because of the presence of the Ca and Mg on the beads. To remove them, you need to perform regeneration process.

We will now understand the restoration process in the water softener. The salt water solution is poured into the mineral tank, and by doing so the Ca, and Mg ions will be removed, and salt will get back covered on the resin beads. This way we can say that the beads are now recharged back, and ready to be used.

Some Health Considerations

Drinking hard water is not bad for health since you are consuming minerals from it. But the same is not found to be suitable for the electric appliances, which uses hard water. So for increasing the lifetime of such appliances, you must install a water softener.

The water which is a treated one contains salt in it. It does not harm the human body, but it should not be consumed by those who are on a sodium-less diet. For other users who have no issue with consuming salt, can use this. You will find the water to be a bit salty in taste.

Also, you can make use of potassium chloride instead of the salt for softening. But such system is found to be costlier than the usual softener systems.

Other popular reads: Top Picks of Salt Free Water Softener in 2020

Hope you all liked this post on Water Softener Parts: Guide for Beginners. And it helped you in understanding the softener system more clearly. If you have got any issue with the concepts discussed here, mention them in the comment section below. For more posts, follow us on WaterGadget.com!

Filed Under: Water Softener, WaterGadget Blog Tagged With: Water Softener Parts

How do Watering Globes work? – How it works

February 13, 2020 By Water Gadget

If you are a plant lover or you own a garden, then you must be aware of the importance of watering to the plants. It is very important to provide water to the plants at a regular interval of time. This can be done with the help of the watering globes, here we are going to discuss How do Watering Globes work?

The watering globes is a very effective and one of the perfect alternatives to daily watering. With the help of the watering globes, you can easily provide water to the roots of the plants without any effort. You just have to install this watering globe into the soil of the pot.

Now, this watering globe will automatically seep out the water into the soil. This will help in keeping the soil moist for several days without any human intervention. You will get to know the working of watering globes in detail in the later section of this article.

How do Watering Globes work?

How do Watering Globes work?

The water globe is a kind of sphere or bottle that is buried in the soil to provide water to the plant. It helps to maintain the moisture in the soil to prevent the plant from wilting. Also, the watering globe helps to prevent the plant from the problems like overwatering or underwatering.

You have to bury the watering globe into the soil of the pot and it will start providing water to the plants. This will keep the soil of the pot moist for a long time and it releases oxygen when it gets dry. When the soil becomes dry, the globe will start releasing the exact amount of water into the soil.

  • After you have buried the water globe in the soil, the water will start flowing through the tube. This tube provides water to the roots of the plant.
  • This globe will last for up to a week or two depending on the usage of water.

With the release of the exact amount of water, the plant will not suffer from the overwatering problem. So, the watering globe technique is the perfect alternative to other watering methods. You don’t have to worry about your garden or plants as the watering globes will take care of them.

Now that you all know How do Watering Globes work? buy one for your home or make at your home. Tell us about your experience of using the watering globes. You can share your thoughts and ask your queries at Water Gadget. Thank you.

Filed Under: WaterGadget Blog, Watering Globe

Best Water Softener Salt – Our Recommendation

February 11, 2020 By Water Gadget

Here we will provide you some info about Salt for Water Softener – Our Recommendation. Deciding the right softener salt is equally crucial to that of choosing the softener system.

You might have come across many product reviews till now. But only a few of them have mentioned about the types of salt available for the softener. So here we have tried to put some light on this topic of Salts for Softeners.

If you wish to know more about types, and popular Salts which are best for you Water Softener then we suggest you to keep reading. At the end of the post, you will be a knowledgeable person about the salt types which are the best for softener systems.

Best Water Softener Salt Types:

Not all are aware of the different type of softener salts which are available in the market. Most of the people know about the common salt only. And thereby people miss out the chance of trying out different salts.

You will find almost five types of salt suitable for using in the water softener system. These five types include solar salt, rock salt, for people with health concerns Potassium Chloride pellets, evaporated salt, and finally the softener with hydrogen peroxide.Water Softener Salt

Solar Salt- This type of salt is also known as sea salt, and another form of softening product. It is a byproduct of the evaporated seawater. After the sea water has evaporated, salt crystals which are left behind from the solar salt.

Read | Best Water Softener Reviews 2020 – Our Top 10 Picks!

These crystals are collected in a container and then shipped to markets. The main feature of this salt is that they have got high solubility rate. This means that these salts can dissolve quickly compared to the regular water softeners.

Rock Salt- The salts which can be obtained through mining the grounds, is rock salt. They are the rawest form of salt among all five types listed here. But you may get some worry here about other minerals present along with the rock salt.

This is true that the rock salt has got many insoluble elements in it, but using this for the water softener does not cause harm to anyone. The Rock salt is manufactured, and used by people even today. You need to make sure that system is cleaned at regular intervals.

Potassium- This is one of the popular substitutes used for softening water. Use of potassium in water softeners began when people knew about the danger of salt consumption. And at that moment, use of potassium started, and since then there haven’t been much decrease.

Read our full review on: Fleck 5600SXT Water Softener

Using common salt for softeners were going on when a group of consumers in the 1980’s started the awareness. This awareness was about the continuous use of salt, which was present in the softened water.

Evaporated Salt- This is the purest form of salt that you can use for softening purpose. This Water Softener Salt is dissolved in the raw form itself, and then all the moisture is taken from it. The material which is left behind is salt, which is in the purest form.

Other suggestions: Best Morton Water Softener

Hydrogen Peroxide- This is more of a chemical compound. Still, it can work well in treating hard water. This peroxide product is a cleaning agent and can be used in eliminating germs or other bacteria. Some people also this compound into the drinking water, for the same purpose.

For the softening purpose, Hydrogen Peroxide can be added along with the regenerating product. This will help in disinfecting the water after calcium and magnesium elements are removed from the water.

Water which has been treated with the hydrogen peroxide results in some taste difference. Some people prefer this difference, while some people do not like this taste. This takes less processing time compared to the ordinary water softening process.

These are the different types of salts which can be used for water softener.

Know | Water Softener Parts: Guide for Beginners

Morton Water Softener Salt

The Best Seller Salt on Walmart is the Morton Salt System Saver II Pellets. These pellets have being created using the patented System Saver II Formula. This Water Softener Salt helps in treating hard water more efficiently.Salt for Water Softener

The system has got a time-release technology in it, which releases additives for cleaning resin beads within the softener. Proper use of this Water Softener Salt will result in spot reductions on tile, utensils, and faucets.

The weight of the product is 40 pounds, and salt is in the form of pellets. This product helps in maintaining clothes, also keeps the appliances stain-free. It also prevents the hard water effects like scale build-up on pipes and water heater systems.

Walmart Water Softener Salt

The salt discussed in the previous section is the Best Seller Water Softener Salt product on Walmart. Now the next softener salt is among top 4 salts on Walmart. This salt is a natural product, and as explained earlier the salt which is obtained after evaporation, is solar salt.

This salt is in the crystallized form of the salt which is developed with the presence of wind and sun. The features of the product include natural, created using pure salt, this product has got no additives in it, and it also acts well on the hard water spots found on the faucet, and other household machines.

The weight of the product is 40 pounds, and this helps in keeping the clothes and the appliances stain-free. The Water Softener Salt is a natural substance and helps in maintaining the faucet, tiles, kitchen utensils.

Home Depot Water Softener Salt

Both the products discussed in the above two headings are top selling products even on Home Depot. The product we are going to check is third water softener salt on this website. And the name of this salt is Potassium Chloride Crystal Cubes by Nature’s Own.

This product can be used for those who have got sodium restricted diet. For those who are looking for water solutions without salt in the resulting water, then this is a right choice for them. This helps in maintaining the pipes and other kitchen utensils.

Also read: Salt-Free Water Softener Systems

The salt is compatible with almost all water softeners. It provides the right amount of potassium in the diet, and the water is a sodium-free in nature.

Here we explained about the Salt for Water Softener – Our Recommendation. If you are facing any issue with the concept listed here, then ask them out in the comment section below. For more such updates on water treatment, follow us on WaterGadget.

Filed Under: Water Softener, WaterGadget Blog Tagged With: salt for water softener, water softener salt

  • 1
  • 2
  • 3
  • …
  • 9
  • Next Page »

Popular Post

Best Water Softener Reviews 2020 – Our Top 10 Picks!

Featured Posts

Best Watering Globes Reviews – Top Picks for 2020

Best Gas Pressure Washer Reviews of 2020 – Buyer’s Guide

Best Water Pressure Gauge Reviews of 2020 – Recommended by Experts’

Fleck Water Softener Reviews of 2020 | Fleck 5600SXT

Culligan Whole House Water Filter Reviews – 2020 Guide

Best Reverse Osmosis Water Filter Reviews | Buyer’s Guide 2020

Best GE Water Softener Reviews | Complete Guide

Best Water Filter for Frigidaire Refrigerator Reviews of 2020

On the Go Water Softener Reviews 2020 | Comparing the Best For You

Top 10 Best Water Dispenser Reviews of 2020

Copyright © 2025 · WaterGadget

Amazon Affiliate Disclosure

WaterGadget is a participant in the Amazon Services LLC Associates Program, an affiliate advertising program designed to provide a means for sites to earn advertising fees by advertising and linking to amazon.com.