WaterGadget

Reviews with Comprehensive Guide

  • Home
  • Water Softener
    • Fleck Water Softener
    • Portable Water Softener
    • Water Softener Shower Head
    • Salt Free Water Softener
    • Water Softener for Well Water
    • Water Softener Salt
    • Potassium Chloride Water Softener
  • Water Heater
    • Personal Heater
    • Patio Heater
    • Tankless Water Heater
    • Space Heater
    • Forced Air Space Heater
    • Infrared Space Heater
  • Water Filter
    • Water Filter Pitcher
      • Pur Water Filter Pitcher
      • Brita Water Filter Pitcher
    • Under Sink Water Filter
    • Inline Water Filter
    • Countertop Water Filter
    • Faucet Water Filter
    • Refrigerator Water Filter
    • Reverse Osmosis Water Filter
    • Whole House Water Filter
  • Product Reviews
    • Water Dispenser
    • Water Flosser
    • Water Ionizer
    • Water Hose Nozzle
    • Water Glasses
    • Waterproof Cameras
    • Water Sprinklers for Lawns
    • Watering Can
    • Watering Globes
    • Watering Wand
    • Water Table For Kids
    • Water Boiler
    • Water Bottle
    • Water Distiller
    • Water Shoes
    • Water Timer
    • Gas Pressure Washer
    • Water Alarm
    • Water Pressure Gauge
    • Pet Water Fountain

How to Install a Water Softener – The Ultimate Guide

February 16, 2017 By Water Gadget

Here we will provide you with a detailed info on How to Install a Water Softener. Also check out the necessary information about the handling of the softener system.

Hard water has been causing trouble to the home appliances for a long time now. Water with high levels of calcium and magnesium results in hard water. To reduce the hardness in the water, people decide to buy a water softener which will help you solving the issue.

There was a time when people bought considered this product as a luxury. But now with passing time, it has become more of a necessity than a luxury. We will begin with the introduction of the Water Softener technology and check on the installation procedure.

What is a Water Softener

The process of softening is defined as the removal of the calcium, and magnesium ions from the water. These are the hardness causing elements present in the water. The softened water can mix up well with the soap water, creating the right kind of foam. Thus the life of the water-related equipment is maintained with the softener. You must check out various positive Water Softener Reviews to find a good system which fits all your needs.What is Water Softener

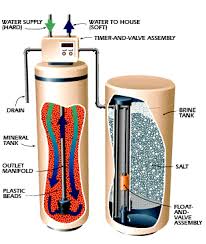
Mainly the hardness causing element in the water include bicarbonates, chlorides, and other sulfates. These can cause limescale buildup within the pipes, and also damage many household appliances like washing machine, water-taps and much more.

Recent updates: Water Conditioner vs Water Softener | Know the Difference

To remove the hardness, water softener system must be preferred. And most of them include ion-exchange resin method. Here, the calcium and magnesium ions are replaced with the sodium ions. Thus the resulting water will be salty in nature.

For those people who are not allowed to consume salt in their meals, should refrain from using the regular softener system. Instead, they can prefer the Best Salt-Free Water Softener Systems, which performs the same task as other water softener system.

Check the Fleck Water Softener working on this – Fleck Manual

If you have got hard water at your place, then it is recommended to treat the water as soon as possible. This is because hard water accompanies other water issues like the taste and the smell of the water is also altered significantly.

How to Install a Water Softener

The level of difficulty varies not only from one machine to another. But there are many other factors which affect the installation of the water softener. Some of them include the type of the pipes used in your area, the location at which you wish to install the unit, etc.how to install water softener

The types of water softener found for the softening purpose are salt-free, salt based, magnetic, Reverse Osmosis, and also a whole-house unit. The magnetic ones are the easiest for installing, while the hardest is the whole house unit. And the whole house unit requires the need of an expert installation.

Here, we will check out the steps for installing water softener unit in a Do-It-Yourself kind of manner. But before this, you need to be equipped with some instruments for the installation.

These machinery tools required for installation of a water softener are Pipe cutters, two union fittings, Teflon tape, two compression settings, gate valves, torch and solder, tubing or copper pipe, tape measure, PVC solvent or flux, flexible tubing, a pipe wrench.

Now we will list out the steps for the installation of a Water Softener system:

Steps of How to Install a Water Softener
1Turn off the water supply from the main line. You need to drain out the pipes at your home by just opening the lowest valve, to let the water be removed entirely.
2Turn off the water heater systems, and also the power which leads the connection.
3Then you have to decide the place where you want the water softener to be set. The connection should be made in such a way that the softener unit is positioned before the line feeds to the water heater.
4Then you need to make a cut on the main line, using the pipe cutter. Place the cutter on the tube, then rotate it all the way around it, till you cut the pipe. If you find any amount of water getting during this process, collect it using a bucket.
5Next step will be to get an elbow setting done on the pipe. You have to set up this fitting if you want to feed the filter, and also you could build a bypass valve to feed through the filter whenever you wish to do this.
6Take the measurement of the pipe which leads to the bypass valve from the main pipe. So you need to cut the pipes accordingly and do the needful soldering before you connect both the pipe and the bypass valve.
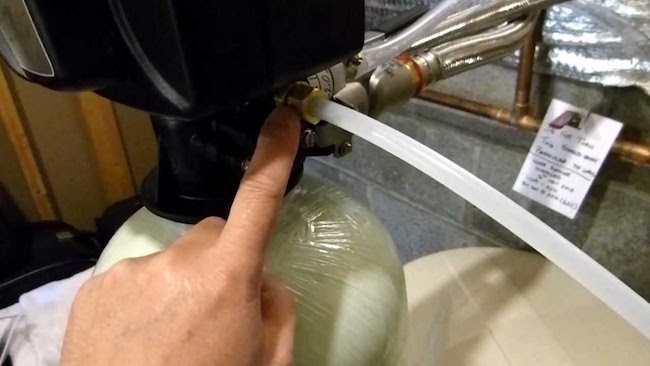
7Now you have to connect the hose to the water softener, by making use of the compression fittings. And this mostly comes with the unit itself.
8Next, you have to clamp the hose with the unit. Then place it till the place where you wish to drain the water softener system. This can be a utility sink, floor drain or any pump kind of structure. The end part of the hose must be placed in such a way that it leaves a gap of 2 inches from the drain hole. Here you need to make sure that the tube is tightly clamped.
9There is an overflow tube in this, and you need to connect this hose with the brine container.
10Place the valve in the bypass arrangement, and let the water flush through it. This will help in removing any sand or sediment present in the pipe.
11And finally, plug the unit, and then set backwash position on the valve found in this.

So, these are the steps that need to be followed for setting up the water softener system at home. And, for whole-house unit installation, it is recommended to hire some expert for this.

Also, check: On the Go Water Softener Reviews 2018 | Comparing the Best For You

Water Softener Troubleshooting

Is your water softener not working properly? If you find any decrease in the performance of the system, then there is the need of some fixes. Now if you have got the old unit, and none of the tips explained here works for you, then you need to make a replacement of the water softener.install water softener

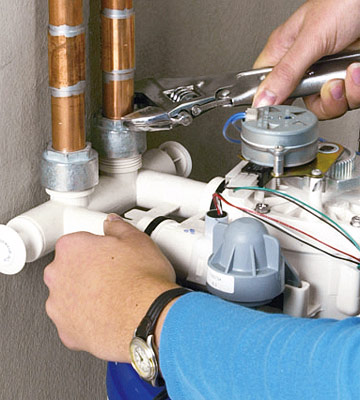
We will list out the three steps that need to be followed for performing troubleshooting. They are as follows:

Check for any issue with the salt- Here you have to test the condition of the salt in the brine solution. You can make use of a broom, and break the salt domes if formed within the tank. Do check out the exact working process of water softener.

When you add salt to this solution, the salt won’t dissolve well here, and thus the softening process will be affected by this. So clean the brine tank, to get the water softener system running back correctly.

Wash the Resin bed properly- Clean the resin bed twice a year, and for this you have to make use of a resin bed cleaner. This is a kind of solution which has to be poured into the resin bed, and then the tank is washed with warm water.

Clean the Venturi Assembly- This is the region through which the brine solution passes through the brine tank to the resin tank. If you find the screen, and the nozzle is clogged with sediments, then hard water will never be softened properly in this system.

Other user guides: How Does a Water Softener Work? – Everything Included

So these are the steps through which you can try troubleshooting your water softener unit at home. If you have got the water softener system running back to normal, then share the tips among your friend circle. And if the issue persists, then let us know by mentioning the problem in the comment section below.

We believe that you are now clear with the steps on How to Install a Water Softener. So all set to rock with the newly installed softener? For regular updates on other water solution systems, follow us on WaterGadget.com.

Filed Under: Water Softener, WaterGadget Blog

Water Softener Maintenance – Different Ways

January 31, 2017 By Water Gadget

We will provide the steps for Water Softener Maintenance – Different Ways, and also discuss various aspects related to it. If you are living in an area with hard water, then buying one softener is recommended for you.

If the continuous use of hard water is done, then you will notice limescale buildup on pipes and other water softener systems. Also, the clothes start fading, and also white patches are found on the kitchen utensils.

The modern water softener works efficiently and lasts long only if proper maintenance is provided to it. You need to conduct regular checks for extending the lifespan of the unit. Let’s get into the steps which are to be performed for a maintenance check.

Water Softener Maintenance

There are three divisions present in the Maintenance process for Water Softeners. And within each division, you have got the steps to perform. The primary task divisions are:Water Softener Maintenance

  • Working on the Brine Tank
  • Clean the Brine Tank
  • Additional Care

Let’s begin with the first phase of Brine Tank Check. Following are the points which are to be followed while dealing with a brine tank:

I. The level of the salt is checked in the brine tank, once in a month. Salt is an essential thing in the process of water softening, as it is the only thing responsible for softening.

And regeneration helps in preparing the resin beads to handle the hard water more efficiently. The salt solution is present in the Brine Tank, for the restoration process, and there is a pre-determined level of the salt in it.

For this, you can refer the water softener manual to know the level of salt allowed for the Brine Tank. It is required to fill the tank with at least half of it with salt. Also, make sure you fill the salt such that it is 3 inches above the water level.

You can increase the amount of salt in the brine tank since it increases the efficiency. But try to reduce the salt, if you find old salt starting to cling to the side walls of the tank.

Read | What Water Softener Salt Is Best To Use?

II. Next, you need to know the type of salt which is best for your water softener. The water softener system mentions the type of salt suitable for it, like granular, pellet, etc. The granular one is the most preferred one since it dissolved in the water easily. It is recommended to go wit the pellet type, as this helps in reducing the clogging issues.

III. Break down the salt bridge if any present. This creates the problem like salt not getting dissolved properly which results in low performance of the water softener. You can make use of a broom, and mix the bottom area of the tank, to break the salt bridges if any.

IV. Check for any mushy structure of salt formed at the bottom part of the tank. You can make use of a broom for handling this issue too. Remove if any present.

Other reads: Northstar Water Softener Reviews – Top Picks 2018

Next task division is Clean the Brine Tank. And the steps include in this are:

I. The major advantage with the current water softener is that they can go without cleaning for many years. So if you notice some difference in the water softener system, then it is the signal for cleaning the tank. Schedule one day for performing the cleaning process.

II. Next step is to empty the tank. For this, first, you need to stop the water intake. Now follow the siphon method or just remove all the water from the tank. Here you have to remove the salt contents too, if any present.

Check this useful source for Waterboss Water Softener reviews.

Don’t dispose the water to the garden, as the salt from the water softener can damage the plants badly. It is better to dissolve the salts in hot water.

III. There is a brine grid in the tank. You need to take this grid out in this step. Some water softener systems have got a platform like structure in the brine tank. You have to put this aside for a while for cleaning the tank.

IV. Take 1 or 2 gallons of water, and mix the considerate amount of soap into it. Pour this solution in the tank, and then using a scrub rub the interior of the tank. It is recommended to use a long-handled brush for this purpose.

V. Wash and rinse the tank with plain water. Then you can use bleach to sanitize the tank. Add 60ml of bleach and water (2-3 gallons), and keep stirring for 15 minutes.

VI. The final step is to rinse the water softener system again. Place the grid back, if there was any in the tank. And, finally, refill with salt water solution within it.

Check our review: Fleck 5600sxt 48000 Digital Metered Water Softener

Here ends the second task division. Keep in mind that following regular Water Softener Maintenance is necessary for long life on your product.

GE is yet another popular brand in the softeners, so you can take a look on their Top Picks too. [reference]

Some additional steps which can be performed for complete water softener maintenance. They are explained in the following section:

I. Work with the valves on the water softener. The bypass valve is similar to the rod in structure, and they are used for blocking water flow. Try to twist the pipe for intake and outtake valve for stopping the working of them. Then place the pipes in their old position, and continue with the work.

II. Make use of water softener cleaner. Using this, you can flush the brine tank once in a few months. Follow the instructions that are given on the softener cleaner solution. In the end, you will be able to use the resin completely, and in the right way.

III. Clean the valve between the resin and brine tank in a water softener. When you wish to add water to the regeneration chamber, the nozzle, and the Venturi Assembly comes into action. These settings help in making a suction system.

You need to disassemble the parts, and clean them at least twice in a year. This has to be performed when the brine tank gets clogged. You can follow the instructions which are provided in the manual. Make sure that all the water pressure within the water softener is removed before disassembling. Otherwise, it may cause damage to the unit.

You can have a peek at this article to get a deeper knowledge on Water Softener parts.

IV. This point is for those, who have tried out each way explained above still getting hard water. Try to perform some other troubleshooting techniques. And they are:

  • Check that the bypass valve is not closed with the regeneration time set on it.
  • If the water usage has increased or you find the hardness has increased, then perform regeneration process.
  • If the digital display is not working properly, then check for the power supply. Also, check if the wires are intact in the water softener.
  • The final way is to hire some expert to examine the machine for you.

So these are the steps of water softener maintenance that you can perform on your own if you wish to troubleshoot the water softener system by yourself. We believe that you have understood each division listed here, and all the processes which are included in each division.

You can find out my review here for the NuvoH2O Water Softener systems.

We hope that this article on Water Softener Maintenance – Different Ways assisted you in the right way. If you have got any question regarding the steps explained here, feel free to post them in the comment section provided. For more updates visit here!

Filed Under: Water Softener, WaterGadget Blog Tagged With: Water Softener Maintenance

  • « Previous Page
  • 1
  • 2
  • 3
  • 4

Copyright © 2025 · WaterGadget

Amazon Affiliate Disclosure

WaterGadget is a participant in the Amazon Services LLC Associates Program, an affiliate advertising program designed to provide a means for sites to earn advertising fees by advertising and linking to amazon.com.